![logo - 512.png]](https://help.timeero.com/hs-fs/hubfs/logo%20-%20512.png?width=75&height=75&name=logo%20-%20512.png)
![]()
![]()
Getting Started - Mapping Employees, Jobs, Tasks & Groups - Mapping Payroll Items
Exporting Time - Viewing Time in QuickBooks Desktop
What Are the System Requirements to Integrate with QuickBooks Desktop?
A Microsoft Windows PC (MAC is not supported) running a supported version of QuickBooks:
- QuickBooks Enterprise (2010 or later)
- QuickBooks Premier (2006 or later)
- QuickBooks Pro (2006 or later)
- QuickBooks Simple Start (2006 or later)
The following international editions of QuickBooks are also supported:
- Canadian editions of QuickBooks (2006 or later)
- UK editions of QuickBooks (2006 or later)
You must also be able to enable the Manual Payroll setting in your QuickBooks Desktop account.
If QuickBooks Desktop is not installed on your computer and you are accessing the account via the cloud, the Web Connector must be installed on the same remote computer.
How Do I Get Started?
- Head to Integrations > QuickBooks Desktop > Configuration.
- Click on Web Connector and follow the steps to install the QuickBooks Web Connector.
- Once the web connector is installed, you can open the web connector from within QuickBooks Desktop by goin to File > Update Web Services or File > App Management > Update Web Services.
- Open the web connector and click Add an Application. Add your file (found in Timeero in the web connector tab).
- Click on the Connect tab inside of Timeero.
- Next, click on the green Connect to QuickBooks button.
- Open the web connector and click on Update Selected. Then, go back to Timeero.
- Finally, you will need to Enable Manual Payroll in QuickBooks Desktop to finish integration with Timeero.
You can import customers, service items, and classes from your QuickBooks account into your Timeero account. Customers in QuickBooks are Jobs in Timeero. Service Items are Tasks in Timeero, and Classes are Groups in Timeero.
Users cannot be imported from QuickBooks into Timeero. You can bulk-add your users to Timeero via our CSV (found in Users tab) or you can add one user at a time.
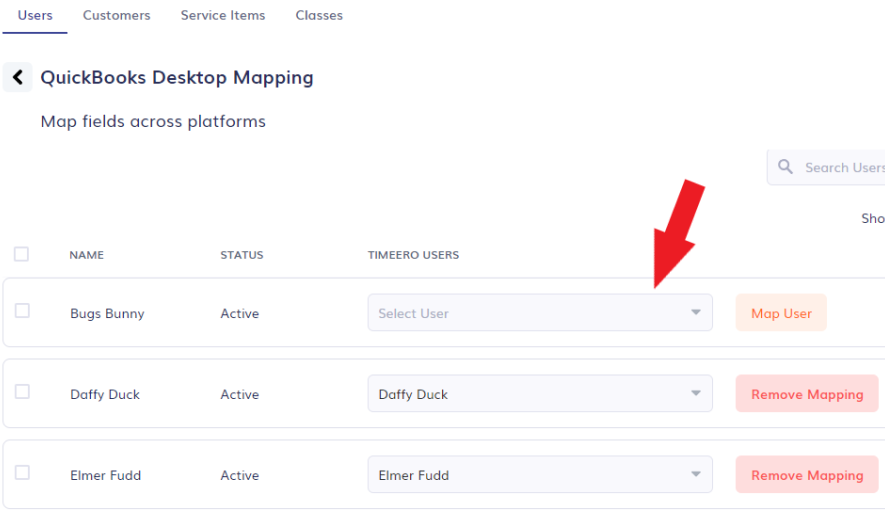
How do I Map Employees, Jobs, Tasks and Groups?
-
Once you are connected, go to Configuration > Users.
-
In the Timeero users column, use the drop-down list to match the Timeero user to the QuickBooks user.
-
Click Map User on the right.
You will use the same method on each of the tabs to match the other categories:
- Timeero Jobs to QuickBooks Customers.
- Timeero Tasks to QuickBooks Service Items.
- Timeero Groups to QuickBooks Classes.
When you're finished mapping, refresh Timeero to confirm all selections have been saved.
How Can I Map Payroll Items?
To fully complete your integration with QuickBooks Destop you will need to map payroll items, even if you don't use QuickBooks Payroll.
-
Go to Integrations > QuickBooks Desktop > Configuration. You can find detailed instructions on how to set up payroll items in QuickBooks Desktop by following this link here.

How Can I Export Time to my QuickBooks Desktop Account?
Before you can export time you will need to enable Time Tracking in QuickBooks Desktop, which you can find detailed instructions for here. Once set up, follow the instructions below to send your time over.
- Go to Reports > Report by Date Range or Report by User or Group.
- Fill out the date range you are running payroll for and click Generate Report.
- Confirm the information is accurate and then click Export > Export to QuickBooks Desktop.

Where Can I View Exported Time in QuickBooks Desktop?
- Open QuickBooks and make sure it is synced with the new data by going to File > App Management > Update Web Services.
- Select the checkbox next to Timeero and click Update Selected.

- Next go to Employees > Enter Time > Use Weekly Timesheet to view the exported time on employee timesheets. Once you have confirmed accuracy, you should be able to process payroll as normal.
*It's always a good idea to force an update before processing payroll, even if you have auto-run turned on. This ensures that all changes made in Timeero are exported to your QuickBooks account.