![logo - 512.png]](https://help.timeero.com/hs-fs/hubfs/logo%20-%20512.png?width=75&height=75&name=logo%20-%20512.png)
![]()
![]()
Learn How to:
- Discover how Timeero simplifies the time-consuming payroll process with tools designed to make it easier than ever.
-
Use this walk-through to navigate the Paychex setup and payroll export process with ease.
How Do I Connect Timeero to my Paychex Flex Suite?


Content:
- Key Information
- Pre-Integration Checklist
- Integration Setup Instructions
- Next Steps to Complete in Paychex
- Updating Integration Settings After Adding New Items
- Disconnecting the Paychex Integration
- Frequently Asked Questions (FAQs)
What Does the Key Information Include?
It's crucial to go over a few items to make sure the integration is compatible with your workflow and requirements.
Is There an Integration Fee?
There is no integration fee for connecting Timeero with Paychex.
What Data is Transferable from Timeero to Paychex?
- Regular hours
- Overtime hours
- Double Overtime hours
- Mileage dollar amount to be reimbursed
- Job codes
What do I Need to Do Before Integrating?
- Add your users/employees
- Setup your overtime rules
- Make sure employees are set up. Any employees who need to use Timeero need to be active.
- Make sure to set up a mileage deduction or earning code if you need to reimburse for mileage.
💡Tip: Follow Paychex's guide on payroll setup to seamlessly export from Timeero to Paychex.
Integration Setup Instructions
- Connecting Timeero with Paychex.
- Mapping Timeero users with Paychex workers.
- Map earnings code with payroll items in Paychex.
- Export hours and mileage reimbursement to Paychex.
- Job Costing and Labor Code Assignments.
How Do I Complete Step 1: Connecting Timeero to my Paychex Flex Site?
In Paychex:
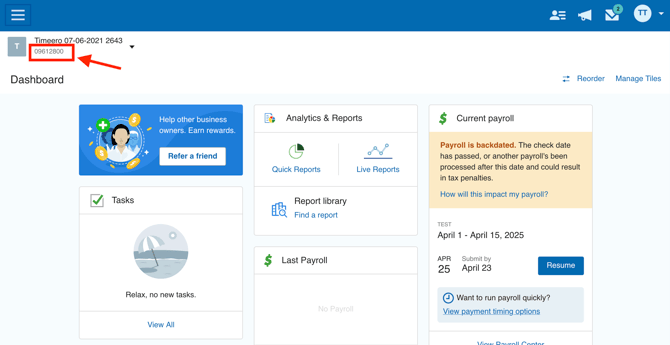
- Retrieve your company ID by logging in to Paychex. Your Paychex company ID can be found on the top left corner.
- In your Paychex account, enable Access Inflex under Company Settings > Access > Integrated Apps.
In Timeero:
1. Head to Integrations > Paychex API.
2. Choose Configurations and then click Connect.
3. Enter your Paychex Company ID.

4. Click on Connect to initiate the connection process.
5. You will receive an email from Paychex with a confirmation link. Click on that link and follow the instructions to enable the integration. Refresh your Timeero page to access the integration settings. (this email will include a link that tethers your Paychex account to Timeero).

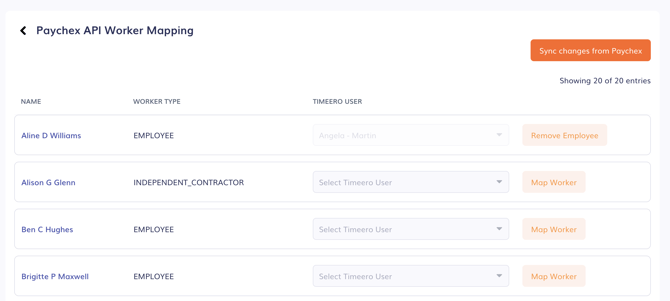
How Do I Complete Step 2: Mapping Timeero Users with Paychex Workers?
- To map Paychex workers to users in Timeero, find the Paychex API tile on the Integrations page in Timeero (Integrations > Paychex API).
- Next choose Configuration > Configuration Mappings.
- Select the Timeero user you would like to map by choosing the user from the drop down and then clicking Map Worker to complete mapping of the worker. If a user is not showing in the dropdown list you can activate the user in Timeero, if they are deactivated, or you can simply add them as a new user.
How Do I Complete Step 3: Map earnings code with payroll items in Paychex?
The hourly and mileage codes must be correctly mapped in Timeero to Paychex pay items. If you are using overtime settings in Timeero, you must correctly map the Overtime and Double Overtime settings in Timeero to the appropriate Paychex Pay Items.
To do so, go to the Configuration map the codes and hit Save.

How Do I Complete Step 4: Exporting hours and mileage reimbursement to Paychex?
To export or send hours to Paychex:
- Go to Reports. Choose to export by using Report By User or Group (export for a select few users) or Report By Date Range (export data for all users).
- Select the date range and employees, if using Report By User or Group and click on Generate Report.
- Select Export > Export to Paychex Flex.
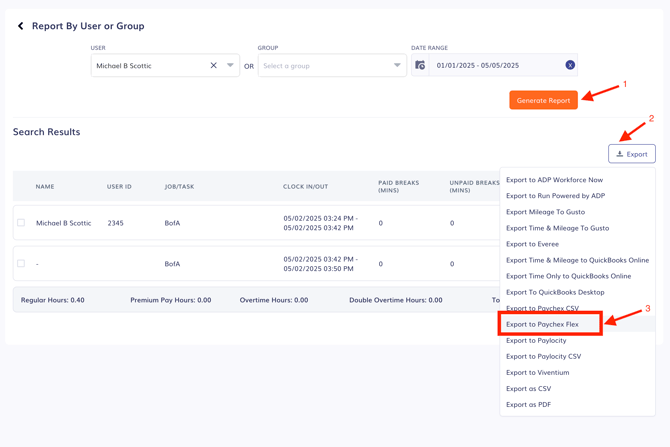
- You will be asked to select a pay period to submit hours for. Select Proceed.
- Click on the bell icon in the top right corner. If there are any errors with your
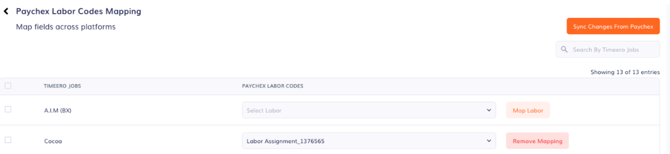
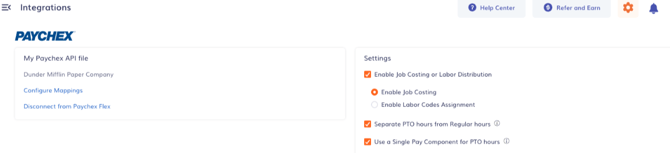
How do I Complete Step 5: Job Costing and Labor Code Assignements?
1. Enable Job Costing- When this is turned on, Timeero tasks must be mapped to Paychex job codes.
2. Enable Labor Code Assignment- When this is turned on, Timeero jobs must be mapped to Paychex labor codes.

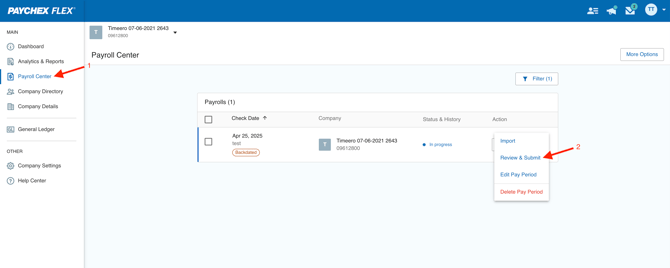
What are the Next Steps to Complete in Paychex?
You have successfully exported hours worked and mileage expense reimbursement amount to Paychex. It is important to verify the data exported to Paychex looks fine.
Click on Payroll Center on the left navigation menu and click on Resume & Submit for the correct payroll batch.
Do I Need to Update Integration Settings After Adding New Items?
Whenever you add or remove employees, contractors or update payroll items in Paychex, you will need to manually sync to enable the new changes to flow into Timeero.
You can do so easily by finding the Paychex Flex tile on the Integrations page.
1. Choose Configuration > Configure Mappings and then click Sync changes from Paychex.
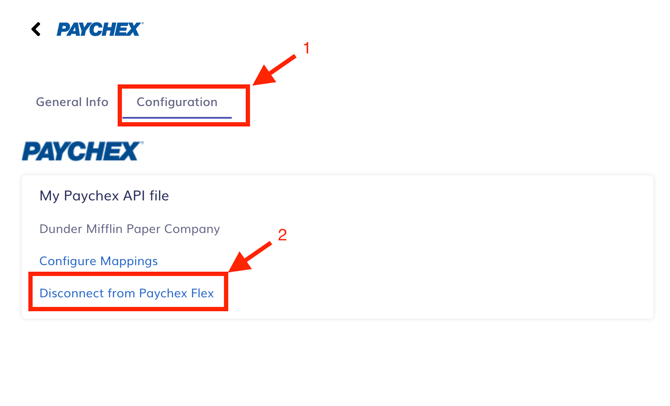
How Do I Disconnect the Paychex Integration?
If you need to disconnect Paychex from Timeero, you can do so easily by finding the Paychex Flex tile on the Integrations page.
Choose Configuration and then choose Disconnect from Paychex Flex.
Frequently Asked Questions (FAQs)
What happens when you export the same pay period data more than once to Paychex?
Paychex will simply override any pay period data exported more than once.
Why do contractors not show up in my list of Paychex users?
The Paychex API does not support exporting hours to any user type that is not an employee.
Some users in Paychex are not showing up in Timeero. What should I do?
Make sure that the users in Paychex are set to active and are employees. Paychex API does not support sending hours to user types that are not employees.
What does the message: "You have entered hours/units but there is no default rate available for this payComponent:.....If you want to pay this worker according to hours/units, please provide a rate." mean?
Make sure that the pay components have a default base rate set. If not Paychex will reject the export.
What does the message: "The information you have entered cannot be saved as the paycomponent range does not belong to the PayPeriod you have provided." mean?
If you recently created an earning pay code, the start date needs to be before the pay period you are wanting to export. Try setting the pay component to an earlier date in Paychex.
What does the message: "The Hourly PayComponent:\XXXXXXXX\' you are trying to add is not supported for requested workerType:\'INDEPENDENT_CONTRACTOR\" mean?
This means you are trying to send hours to a user in Paychex who is not set to receive the specific pay component. In this example, independent contractors cannot be paid by the hourly pay component. You will have to figure out or contact Paychex on how to allow for that.