This article will help you connect to gusto, import employees from gusto, and export time & mileage costs from Timeero to gusto.
![]()
![]()
First, enter a mileage reimbursement rate in Timeero.
1. Company Settings > General > Mileage Cost (per mile)
2. Enter that rate in decimal format 0.625, for example
To set up your integration with gusto:
Choose Integrations from the left side menu.
Next, select gusto, then Configuration & click the Enable button.
Sign in to gusto when prompted.
Setting up gusto
The website will route you to the gusto page where you will need to give authorization for Timeero to access your account.

Syncing Changes from gusto
Select Sync Changes from gusto in the top right corner. This will import your employees from your gusto account.
Next, you must map your gusto employees to your Timeero employees.
If you've already added all users to your Timeero account: Choose the correct gusto Role/Job Title and the correct employee from the Timeero Users column and then click Map Employee on the right side of each user you wish to map.
If you have not yet added any users to your Timeero account: Select which employees you want to add to Timeero by checking the box to the left of the gusto User name. Scroll to the bottom of the page and click on the Import Users button. You may have one page or multiple pages depending on how many users are in your gusto account. You will need to click on the Import Users button on each page if you have multiple pages. Next click on the Sync Changes from gusto button in the top right corner and proceed with mapping. Choose the correct Role/Job Title and the correct employee from the Timeero Users column and then click Map Employee on the right side of each user you wish to map.
1. Employee names and email addresses must be identical for automatic mapping. For example, if you have an employee named Jon Smith with the email address jon@noemail.com in gusto, that same email address must exist in Timeero for automatic mapping to work. If email addresses are not identical, you must map each user manually.
2. The gusto Role/Job Title is a required field on Timeero's mapping page. Be sure this field is not left blank and matches what is in your gusto account.

Exporting data to gusto
Once you have mapped all users, you can start sending time and mileage costs gusto.
First, enter a mileage rate in Timeero. Go to Company Settings > General and enter a mileage cost of .625, for example, in the mileage cost per mile field.
To export time and mileage costs to gusto, follow these steps:
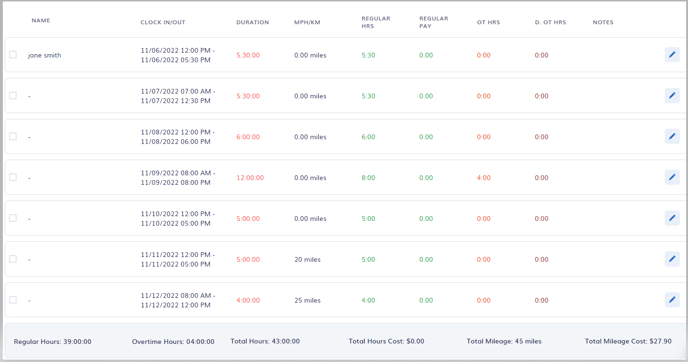
1. Select Reports in your Timeero account and then choose the Report by Date Range OR Report by User or Group.
*** The gusto integration does not work with Report by Totals.
IMPORTANT NOTE: Time/mileage costs can only be sent for hourly employees. Contractors and salary workers are not supported. If you have employees and contractors in your Timeero account, create 2 groups. One for employees and one for contractors. Use the Report by User or Group and select the employee group. Then, export.
2. After clicking on the Generate Report button, click on the Export button and then choose Export Mileage to gusto or Export Time & Mileage to gusto.
A dialog box will pop up for you to select your payroll period.
If the correct pay period does not populate, please head over to Integrations > gusto > Configuration > View Mapping, and once there, click on the Sync Changes From gusto button.
Once you have exported the report to gusto, you can find it under the Run Payroll tab in your gusto account. Select the date you'd like to view and your employees updated hours will show. The mileage cost will be shown in Reimbursements.
Gusto Integration Video