Creating a Time Off Category
Only available on the Premium plan
Go to Time Off Setup under General Settings, you’ll land on the Time Off Categories tab by default. From here, you can create, edit, or delete categories.
At the top left of the page, there's a Status toggle that lets you switch between active and inactive categories. On the right-hand side, you can search for a specific category by name.
Note: Admins can also frontload the hours per employee or allot the full amount at the start of the year rather than earning it gradually. In Timeero, you can set a yearly accrual to track the accrual for each employee.
Users will see if the submission request was "approved" or "declined", approved requests if canceled afterwards will show "withdrawn", on the Time-Off Requests page.
Admins will need to create a Time Off Category in the company settings. Navigate to "Create Time Off Category", then go to accrual, and set the accrual balance for the employee. Then navigate to the Time Off section>Accruals & Balances> then select a user to adjust an accrual balance if needed.

How to Create a Time Off Category
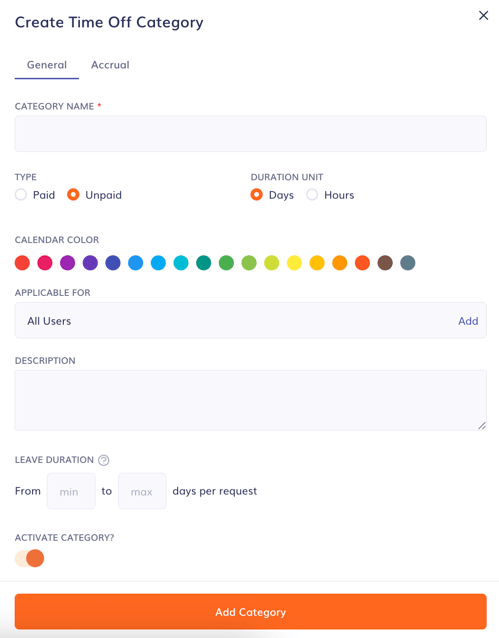
Click Create Time Off Category in the top right corner. You’ll be taken to the General Settings section, where you’ll fill in key details for the new category.

General Settings include:

- Category Name: Enter a name for the time off category.
- Type: Choose whether the time off is paid or unpaid.
When an employee submits a time off request, they will select one of the categories. Based on that, the request will appear on the admin’s request page.
- If the category is paid, the admin can create both a timesheet entry and a shift for the request.
- If the category is unpaid, only a shift can be created.
- Duration Unit: Select whether the request will be shown in days or hours. This setting affects how the request is submitted and how accruals are calculated.
- Calendar Color: Pick a color to visually identify this category on the Calend
ar and in Accrual and Balances. If no color is selected, a red-orange color will be used by default. - Note: A greenish teal color will be the default color for all PTO shifts in the Calendar, any other category colors assigned will be shown in the Time off calendar.
- Applicable For: Select which users can access and use this category when submitting a time off request.
- Description: Add a clear explanation for what this category is used for.
- Leave Duration: Set a limit on how many min and max days or hours employees can request per individual request.
- Activate Category?: Decide whether the category should be immediately active (visible and usable by employees) or inactive (visible only to admins).
Once you're finished with the General Settings, proceed to configure the Accrual Settings.
Accrual Settings include:

-
User Accrues: This setting controls how much time off an employee earns and how often.
For example: 1 day, Monthly means the employee earns 1 day of time off each month, totaling 12 days per year. -
Accrual Frequency: Choose how often the time off should be accrued. Available options include:
Hourly, Daily, Weekly, Twice a Month, Monthly, Quarterly, Twice a Year, Yearly, or On Anniversary. -
Waiting Period Before Accrual: Determine when the employee starts earning time off:
-
No waiting period: Accrual begins immediately from the date the time off category is created.
-
With a waiting period: The admin can set a specific delay before accrual starts.
-
Cap on Employee Accrual Balance: Control whether there's a maximum limit on how much time off can be accrued:
-
No cap: Employees will continue to accrue time off, regardless of their current balance.
-
Cap applied: Once the balance reaches the set limit, accrual will stop until the balance drops below the cap.
-
Carryover Expiration: Set rules for unused time off at the end of the accrual period:
-
Use it or lose it: Any unused days will expire at the end of the period.
-
Carry over: Unused time off will roll into the next period and remain available.
-
Initial Time Off Balance: You can give employees a starting balance when this category is assigned—for example, 5 days on Day 1. Decimal values can be used, when creating those categories.
-
Allow Negative Balance: Enable this setting if you want to allow employees to request more time off than they’ve earned so far. When turned on, employees can have a negative balance—helpful for front-loading time off or special exceptions.
Once a time off category is created, the accrual setting cannot be edited.
Only certain fields can be edited. These include the category name, calendar color, applicable users, leave duration, and the category status (active or inactive).
Please note that only categories with accrual settings configured will appear under the Accrual and Balances section.
![logo - 512.png]](https://help.timeero.com/hs-fs/hubfs/logo%20-%20512.png?width=75&height=75&name=logo%20-%20512.png)